Hello and Welcome
to the Beginners Block of the Month
for 2016
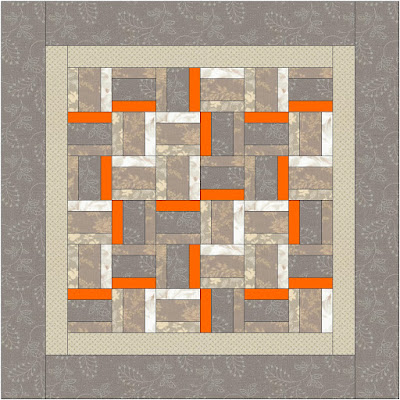
Last year I had a beginners block of the month for those of you who would like to learn the skill and also make something with all your blocks. This year we will do the same. The beginners block of the month has a Japanese Quilt theme with easy to make 10" (26cm) blocks that can be assembled into a quilt once we're all done.
There are 16 blocks to be made, so some of the months we will be making 2 blocks instead of only 1.
For January we have 1 block to make so that all can get onto the same page quickly. The block is very easy but also very striking. The simplicity is part of its charm.
To make this Japanese Quilt you need to think of muted fabrics with one of the pieces in your block being an accent in another brighter colour. I love the idea of a "Taupe" colour quilt, so I did a little research and found this idea and then made it into a Paper Piecing project.
You can change your accent block around just as you like and you can also change up the colour just as you like.
This simple design can be very beautiful in a quilt all on its own too.
Lets get started on how we do this beginner block -
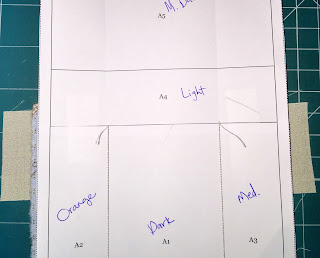
The pattern only has 2 pieces. They will have to be joined together first before sewing.
Each of the joins will have a number - so you find the corresponding number and they will be joined together.
What I do is cut off one of the "glue edge" pieces along the line and then stick that over the other exactly onto the line where they will be joined.
I use sellotape to join my pieces and it works well.
These are the fabrics I found and gathered together for this project. They are a combination of Taupe, Grey, Beige, Brown, and something that is in my mind very muted "grey- eige" (grey + beige).

The accent colour can be something that is also in itself a muted colour but a complete contrast to your other fabrics. You can go with the burnt orange, turquoise, or even blue.
Really up to you....

I like to write the number or name of the colour onto my pattern pieces so that Im not confused later.
Then its onto the first piece.
We always start with #1 and move through the numbers from there.
I cut strips from my fabric that are bigger than my size of the piece I need it for. You need to also have seam allowances on all sides.
The second piece of fabric for #2 will be facing the first piece so that you get your 'right sides together'
I have a lamp on my desk that helps with this, so I hold my piece up to the light and it shines through and shows where the piece is lying on the back of the paper.
Piece of fabric #2 will go above the line between #1 and #2 so that a seam will be formed. Dont go for a too small seam. Rather make it bigger. Your fabric needs to cover all of #2 and even past the paper a little.

Now we sew the line between #1 and #2.
Fold down the paper to reveal the seam you have just made.
You can now cut across with a ruler. Make sure you have a 1/4" seam allowance.
Now turn the paper, Open up the sewn portion and press the seam open. You can use a warm iron or you can use your fingers to make sure the seam is flat and lying down properly.
Now turn it back to the paper facing you and you're ready for piece #3.
Do the same for all the pieces.
You can also lie the piece you want to attach onto the desk and place the template over it. Make sure to leave the seam allowance.
Once all the pieces are sewn onto the template, you will need to trim the edges to get a neat piece.
Use your ruler and cut around the outside of the template. Do not cut off any of the edges. They form the seam allowance and you do need them.
Once your 2 pieces are finished. You can arrange them just as you like. I wanted the accents in the middle, so thats the direction Im going in.
Each block is different so it won't matter if you choose to make it with the accents in or out.
You can also choose to make your accent piece in another spot if it suited you....
Once the two are ready, you need to sew them together. I like to use pins going through the paper to the line on the other side - then I know they have lined up. Be sure to line up any pieces in the middle that need to be joined.
This is my finished block (minus the pressing with an iron).
I will only take out the paper once Ive joined the first row and lined up all the seam allowances.
I hope this has helped a few that need to learn what to do.
Im sure you are all going to make amazing quilts this year....
The pattern is Free for January. You can find it in my Craftsy shop.
There will be a BOM page button on the right of the blog where you will find all the block of the month information. On each of these I will add the pattern with quick links too.


5 comments:
That's really great designs. I', really happy to find this amazing blog.
So many options with these blocks and you sure dont need to be dipping your feet into paper piecing to give these a whirl, great how too by the way as well :)
I would like to make the bom quilt. Could you provide more detail on how many different fabrics are needed and the yardage on each. I will need to purchase the fabric.
I would like to make the bom quilt. Could you provide more detail on how many different fabrics are needed and the yardage on each. I will need to purchase the fabric.
So excited and glad I found this! I went to craftsy and got the patttern. I can not locate the info on total amount of fabric needed. I have some fat quarter bundles. Not sure they will be enough. Can you direct me to this info? Thanks
Post a Comment