Hello there
Its the Wonky Houses Quilt A Long Start...
I hope you're all ready to have loads of fun!
Over the next 3 weeks (21 days) we will be putting this cute 36" (92 cm) artsie quilt together. The pattern is really easy and should be manageable even by someone with beginner skills.
As you can see you can use up a whole lot of scraps and its going to look great.
Ive divided the Houses into 3 rows which means one row a week. Not even a lot of hard work.
This is our First Week plan.
The pattern pieces you will need to find are from A - Z; AA - AP. This is our whole week, so it will be easy to grab the next section as you go.
For Monday Ive sewn piece 1 with the trees. This is pieces A - J.
Before I start, I want to talk about the joining of the pieces.
The software breaks the pieces that won't fit on one page. Each piece has a corresponding number. Each also has a extra piece that will overlap where it needs to be joined. You can use sellotape or glue - as you like. Just wait for the glue to dry before you sew and if you use tape, remember you can't iron over the tape.... not a good idea.
This is how I do mine...
I find the two pieces with the corresponding numbers and on 1 of them, I will cut off the extra piece along the line where it says "glue edge".
Now I take the one I cut and place it over the 'glue edge' piece and line up all lines. Then I take sellotape and stick it down and curl it around to the back as well.
Just remember that line now going across the pattern piece is not a dividing line, so either remember that or take a pen and make a wiggly line through it and know that it means 'this is not a sewing line'
Once your glue is dry you can now start sewing...
Ive added the colour codes to the pieces but its not at all necessary that you follow everything stricktly. Its to give you an idea in the fabrics and how much you will need. The background also does not need to all be one colour, just as you like.
This is our Day 1 piece.
I laid out the pieces in front of me and grabbed my box of scrap pieces. Im going scrap crazy on this one.
There are also areas where you can do a little fussy cutting if you'd like.
I love how it turned out - super cute!!
Pattern is available in my Craftsy Shop if you would like to make a few Wonky Houses along with all of us.... The pattern is super easy - so if you can even do an easy star, you can manage this.
Sewing those Wierd Angles:
Today I also want to show you all how I deal with some of the "wierd angles" that you will have to sew.
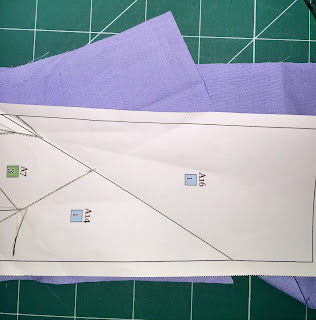
Piece A16 was one of them
I only had that piece of blue to use for that section and as it is there, it did not fit.
So this is the way that I deal with these things and having a piece of fabric that is big enough but because of the wierd angle it won't work....
This can work for both a plain piece of fabric or even a patterned piece.
You lie your pattern segment over the fabric making sure that it will fit on all sides.
If it is plain then who cares which side it is on, but if it is a patterned fabric, then the pattern side needs to face down - towards the desk and then the segment placed onto it.
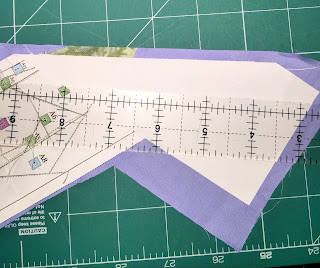
Now take your ruler and place it on the line that you are going to sew on. It must be on the side that you are working with (on the side of A16)
Now you hold your ruler with one hand and with the other you push up all the pieces behind it
(my hand isnt holding the ruler because its holding the camera...)
You're making a fold line across the A16 line.
Once youre convinced its all straight, then fold it over, take the ruler away and finger press the fabric to create a line across that will be visible.
Now open the fabric that you have added and leave the already sewn part. You should see the line you pressed into the fabric.
You now remove the top sewn section, and fold the fabric along the line you pressed.
Now bring back the folded piece with the paper and place it again along the folded line.
Make sure to then see that the paper piece still fits the fabric. If its over then just pull it back up along the fold until it is back ontop of the fabric.
Now open the paper pattern piece to lie flat again. Don't let it move off the fold line you created.
You now need to hold the piece with your thumb and gather the pieces behind that you folded up.
Not the piece that is extended - only the piece that was folded.
You will then even notice that if it was a patterned piece, it will now have turned and face the correct way to sew.....
Sew the piece as normal
This way beats working out the wierd angles or even having to take a huge piece of fabric to cover the section.
If you practice this technique a little, you will get so used to doing it, and wierd angles will be a thing of the past....
Promise!!
you fold down the paper and trim as usual
And Wha-La!! it fits perfectly...
Now a quick press and then trim all the edges.
I hope this helps!
**************************
Tomorrow we will be doing our Bitty Block, so I'll be back on Wednesday to discuss our Wonky Houses QAL further. I hope you all enjoy sewing along with me.
Have a Great Monday!


2 comments:
ohh so tempting! just have several things lined up....
This so much fun and great for scraps, I have really enjoyed the first row, I know a bit ahead but a quiet week ;)
Post a Comment